What This Guide Helps With
This guide matches the right patching method to the right hole size. Using the wrong technique — spackle on a large hole, or a patch plate on a nail hole — wastes time and creates visible bulges or cracks. The decision depends on the hole size, not just what products you have at home.
Quick Answer
Nail holes and small dents need only spackling compound applied once. Holes up to about 6 inches need a self-adhesive mesh patch plus joint compound in two to three coats. Holes larger than 6 inches need a backing board plus drywall patch plus joint compound. Texture and paint matching is the hardest part — plan for that before you start.
Before You Start — Two Things to Check
- Is the hole from water damage? If the drywall is soft, crumbling, stained brown or yellow, or has any black spotting, do not patch it yet. See our guide on water stains and mold identification. Patching over water-damaged drywall without fixing the source causes the repair to fail and the moisture problem to continue.
- Is there anything in the wall? Electrical wires, plumbing pipes, and HVAC ducts run through walls. Before cutting into a wall for a large repair, use a stud finder with AC detection or a phone app to check for wiring. Do not cut into a wall without this check.
The Hole Size Decision Chart
| Hole type / size | Method | Products needed | Coats of compound |
|---|---|---|---|
| Nail hole, screw hole, small dent (under 1/4 inch) | Lightweight spackling compound, no patch needed | Spackle or lightweight joint compound, putty knife | 1–2 coats, sand between |
| Small hole (1/4 inch to 1 inch) | Spackling compound with spreading | Spackle, 3-inch putty knife | 2 coats, light sand |
| Medium hole (1 inch to 6 inches) | Self-adhesive mesh patch + joint compound | Mesh patch kit, 6-inch knife, joint compound, sandpaper | 3 coats minimum |
| Large hole (6 inches to 12 inches) | Backer board method + drywall piece | Wood backing strips, drywall piece, screws, joint compound, tape | 3–4 coats |
| Very large hole (over 12 inches) | Cut to stud, replace full panel section | Reciprocating saw, stud finder, new drywall, screws, tape, compound | Full finishing process |
Method 1 — Nail Holes and Small Dents (Under 1 inch)
- Apply a small amount of lightweight spackling compound with a putty knife. Press it in and smooth it level with the wall surface.
- Let dry fully (check color change from pink to white on most products). Do not rush this — applying paint over wet spackle causes bubbling.
- Sand lightly with 120-grit sandpaper to smooth.
- Apply a second thin coat if shrinkage left a slight depression.
- Sand again and prime before painting. Without primer over the patch, paint sheen will be visibly different even if the color matches.
Method 2 — Medium Holes (1 inch to 6 inches): Mesh Patch Method
- Clean up any torn paper or loose drywall around the hole. The mesh needs clean edges to adhere to.
- Press the self-adhesive mesh patch firmly over the hole. The mesh must cover the entire hole with at least 1 inch of overlap on all sides.
- Apply the first coat of all-purpose joint compound over the mesh using a 6-inch knife. The goal is to fill the mesh weave and the hole — not to make it perfectly flat yet. Feather the edges outward.
- Let dry completely (12 to 24 hours depending on humidity). Do not sand or apply the next coat to wet compound — you will pull it off the mesh.
- Apply the second coat with a wider knife (8 to 10 inch). This coat is for leveling. Feather edges 4 to 6 inches beyond the patch.
- Sand, apply a third thin skim coat if needed, sand again.
- Prime the patch area before painting.
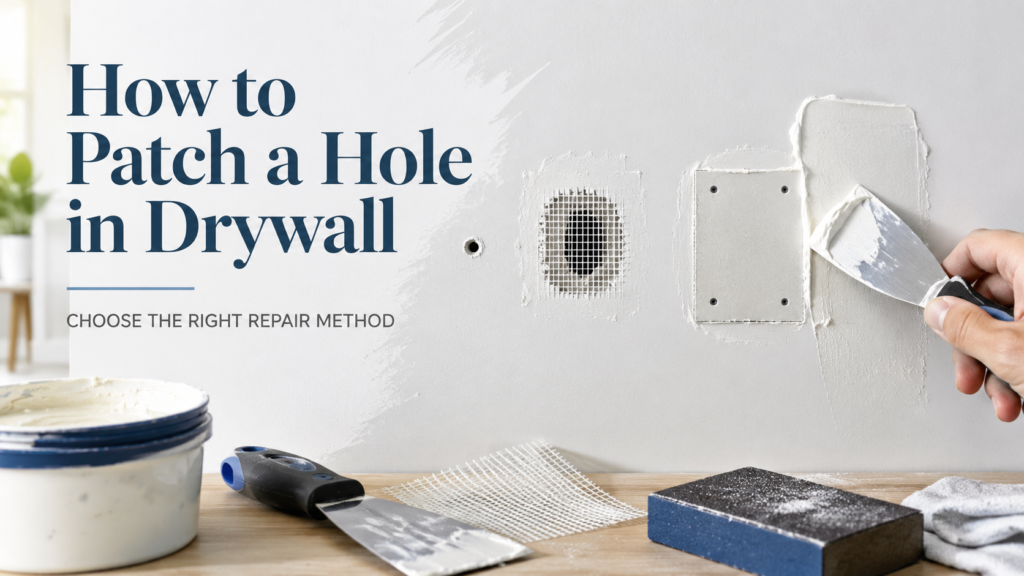
Method 3 — Large Holes (6 inches and up): Backer Board Method
This method creates solid backing inside the wall to screw a drywall patch into.
- Cut the hole into a clean square or rectangle. Use a drywall saw or reciprocating saw — but first check for wires.
- Cut two wood backing strips (1×3 or 1×4 lumber) slightly longer than the hole height. Insert one on each side of the square opening.
- Hold the strips against the inside edge of the existing drywall and screw through the existing drywall into the strips to secure them.
- Cut a piece of new drywall to match the hole exactly. Screw it into the backing strips.
- Apply drywall tape to all four seams and press it into a thin bed of joint compound.
- Apply three or more coats of compound, feathering each coat wider. Final feathering should extend 8 to 12 inches from the seam on all sides.
- Sand, prime, paint, and match texture.
What Not to Do
- Do not apply joint compound in one thick coat. It cracks as it dries. Multiple thin coats are always the right approach.
- Do not skip primer before paint. Paint absorbs differently into compound than into the surrounding wall, leaving a visible “flashing” even if the color matches.
- Do not use spackling compound for holes over 1 inch. Spackle shrinks and cracks in larger holes. Use joint compound.
- Do not sand compound while wet — you will create a rough surface that requires more coats to fix.
- Do not patch water-damaged drywall without identifying and fixing the moisture source first.
- Do not cut into a wall without checking for wires and pipes.
Related Guides
- Water Stain on Ceiling: Finding the Source First
- Black Spots on Bathroom Ceiling: Mold or Stain?
- Interior Repairs, Finishes & Living Spaces
Texture Matching — The Part Everyone Underestimates
Smooth walls are the easiest to patch — sand flat and paint. Textured walls require matching the texture before painting, or the patch will be visible regardless of how good the underlying repair is.
| Texture type | How to match it |
|---|---|
| Orange peel | Aerosol orange peel texture spray; practice on cardboard first |
| Skip trowel | Trowel joint compound in irregular overlapping strokes by hand |
| Knockdown | Splatter compound with a brush, then lightly flatten with a trowel before fully dry |
| Smooth (Level 5) | Sand to 220-grit, skim coat, prime carefully before paint |
Practice texture application on a scrap piece of drywall before doing it on the wall.
Safe DIY Assessment
- Identify hole size and select the correct method from the chart.
- Check for moisture or water damage before starting.
- Verify no wires run through the wall before cutting for large repairs.
- Buy primer as part of the materials — it is not optional.
- Match texture before painting.
- Allow full dry time between coats — patience is the difference between a visible patch and an invisible one.
When to Call a Professional
Call a licensed contractor or drywall professional if:
- The damaged drywall has water staining or softness — the moisture source must be identified first.
- The hole is very large (over 2 feet) or the damage spans multiple wall sections.
- You find wiring or plumbing that must be moved to complete the repair.
- The texture is complex (heavy skip trowel, Venetian plaster, or a unique custom finish) and matching it is beyond your skill level.
- The damage is from structural movement — new cracks appearing along seams or at corners.
Prevention Tips
- When hanging pictures, use wall anchors rated for the weight rather than bare drywall screws. Fewer failed anchors means fewer holes to patch.
- Use furniture bumpers on chair backs and door handle protectors where doors swing into walls.
- Keep a small amount of spackling compound and a putty knife at home — small holes are much faster to fix when you have the materials ready.
Recommended Next Step
Measure the hole and select the method from the chart above. Buy the matching materials — do not substitute spackle for compound or skip the mesh patch for anything over 1 inch. The most common reason drywall patches are visible is insufficient coats of compound, not enough feathering, or skipping the primer. All three are easy to do right the first time with a little patience.
Frequently Asked Questions
How long does drywall compound take to dry?
Standard all-purpose joint compound typically dries in 12 to 24 hours between coats under normal conditions (70°F, 50% humidity). High humidity, cold temperatures, or thick coats extend drying time significantly. Lightweight compounds dry faster. Do not rush — painting over wet compound causes bubbling.
Can I use toothpaste or white glue to patch a small hole?
Toothpaste is sometimes suggested for very small nail holes as a temporary fix. It tends to shrink, crack, and yellow over time, and paint does not bond well to it. For a permanent fix, lightweight spackling compound is inexpensive and far more effective.
Why does my patch show through the paint?
The most common cause is skipping primer. Joint compound absorbs paint differently than the surrounding drywall. Even with perfectly matched paint, an unprimed patch will look different under any light source. Prime the patch area before painting.
How do I match paint color for a patch?
Take a chip of the existing paint (or a photograph) to a paint store for color matching. For a small patch in an older home, exact color match is difficult — a full wall repaint often looks better than a small patch in aged paint. Prime the patch, then repaint the full wall from corner to corner.
Is drywall repair safe for a renter to do?
Most landlords expect tenants to repair small nail holes at move-out. Larger holes are typically a tenant responsibility if caused by them. Before doing significant repairs in a rental, check your lease and notify your landlord in writing.