Quick Answer
A sprinkler zone that does not activate most commonly has one of four causes: the zone valve is stuck closed or has failed, the controller is not sending a signal to that zone, the wiring between the controller and valve has a fault, or water pressure is insufficient to pop the sprinkler heads up. The check sequence matters — starting with the controller rules out 30% of problems in under five minutes.
Safety First
- Sprinkler controllers and valve wiring use low voltage (typically 24V AC) that is safe for homeowners to handle.
- Do not open or adjust the main irrigation supply line at the backflow preventer without knowing where the shutoff is — sudden pressure release can be forceful.
- Do not dig in the yard to find buried valve boxes without first locating utility lines. Call 811 (in the US) or your regional utility locator service before digging.
- If you smell gas near any area of the yard, stop all work and call your gas utility — gas lines are sometimes located near irrigation systems.
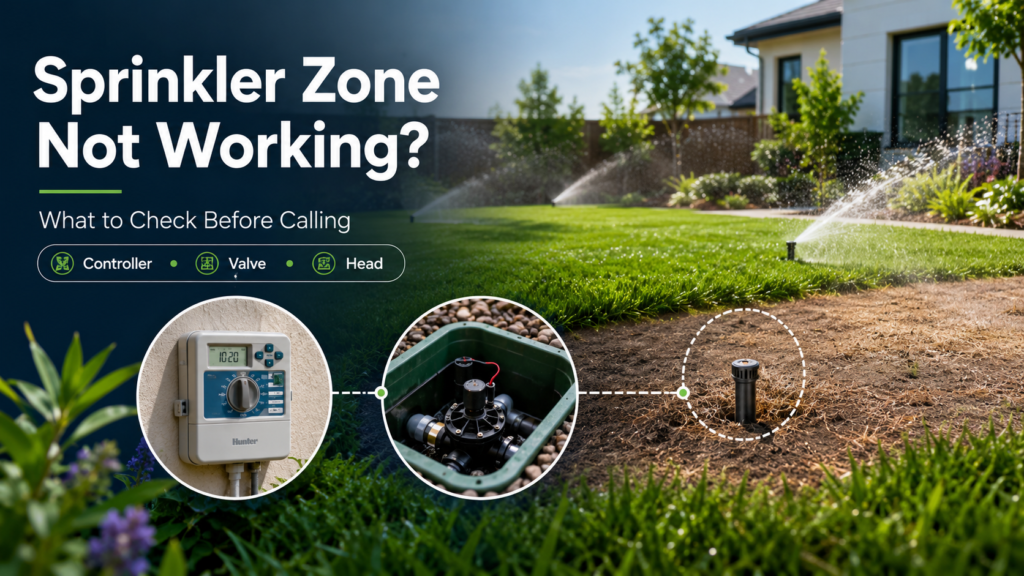
Zone Failure Diagnosis — Work From Controller to Valve to Head
| Symptom | Most likely cause | First check |
|---|---|---|
| One zone does not activate; all others work | Zone valve or wiring to that valve | Manual valve activation test (see below) |
| Multiple adjacent zones do not activate | Wiring fault on shared common wire | Check common wire connection at controller and valve box |
| All zones fail to activate | Controller power, main supply valve, or backflow preventer | Confirm controller is powered and main supply is open |
| Zone activates but heads do not pop up | Low pressure or broken main supply to that zone | Check pressure; inspect for line break |
| Zone activates, some heads pop up but not all | Broken head, clogged head, or cut lateral line | Inspect each head visually during zone run |
| Zone runs but one head sprays wrong pattern | Clogged nozzle or damaged head | Remove and clean or replace that head |
| Zone will not turn off | Solenoid valve diaphragm stuck open or debris in valve | Shut main irrigation supply; replace valve or flush diaphragm |
Check 1 — The Controller (Start Here)
- Confirm the controller has power and is displaying correctly. A blank screen means power is off or batteries are dead.
- Manually activate the non-working zone from the controller. Most controllers have a “manual” or “test” mode that runs a single zone for a set time.
- Listen at the valve box location while activating the zone. You should hear a soft click from the solenoid valve when the zone activates.
- No click: the controller is not sending a signal, or the wiring between controller and valve is broken.
- Click heard but zone does not flow: the valve is receiving signal but not opening — valve fault.
Check 2 — Manual Valve Activation
Every sprinkler zone valve has a manual activation option that bypasses the controller. This test tells you immediately whether the valve is the problem or the controller/wiring is the problem.
- Locate the valve box for that zone — typically a green or black plastic box in the ground, often in a cluster near the main supply line.
- Open the box. Inside are solenoid valves — typically one per zone.
- On each valve there is a solenoid (a small cylindrical device screwed into the valve body). Turn the solenoid counter-clockwise 1/4 to 1/2 turn to manually open the valve.
- If the zone activates when the solenoid is manually opened: the valve works — the problem is in the controller or wiring.
- If the zone does not activate even with the solenoid open: the valve itself is stuck or failed.
Check 3 — Solenoid Replacement
If the valve does not open manually, the solenoid is often the failed component — and it is a $10 to $20 part that screws in and out without replacing the entire valve body.
- Shut off the main irrigation supply at the backflow preventer or zone shutoff.
- Unscrew the solenoid counter-clockwise from the valve body. Note the wiring connections — typically two wires.
- Purchase an exact replacement solenoid (brand and model matter here — take the old one to an irrigation supplier).
- Reconnect the wiring and screw in the new solenoid. Restore water and test from the controller.
Check 4 — Controller Wiring
If the manual valve test confirms the valve opens correctly but the controller cannot activate it, check the wiring:
- At the controller: confirm the zone wire is firmly inserted in the correct terminal (labeled Z1, Z2, etc.) and the common wire is in the COM terminal.
- At the valve box: confirm the zone wire is connected to the solenoid wire of the correct valve. Connections are typically wire nuts — check they are tight and not corroded.
- If wiring looks intact but the zone still fails from the controller, use a multimeter to test for continuity from the controller terminal to the solenoid. A break in the wire (from animal chewing, shovel damage, or corrosion) will show no continuity.
What Not to Do
- Do not leave a zone valve manually open and walk away — this runs the zone until you return. Always close the manual solenoid after testing.
- Do not replace the entire valve body when the solenoid is the only failed component — the solenoid replacement is a fraction of the cost.
- Do not adjust controller schedules to “compensate” for a non-working zone. A dead zone means an area of lawn is not getting water even if the controller shows it running.
- Do not dig for broken lines without utility locates — you may cut water, gas, or electrical lines.
Related Guides
- Outdoor Faucet Dripping: Water Supply Issues
- Low Water Pressure: Could Affect Sprinkler Pressure
- Yard, Landscaping & Outdoor Living
Safe DIY Checks
- Manually activate the zone at the controller and listen for solenoid click at the valve box.
- Manually open the solenoid to test whether the valve activates independently of the controller.
- Check all wiring connections at the controller and at the valve box.
- Inspect individual sprinkler heads during zone run — note which heads pop up and which do not.
- Clean clogged nozzles on heads that spray incorrectly — remove, rinse under water, reinstall.
When to Call an Irrigation Professional
- Wiring continuity test shows a break in an underground wire — wire splicing or replacement requires digging.
- The valve body itself (not just the solenoid) has failed or is leaking — valve body replacement.
- Multiple zones fail simultaneously and the main backflow preventer or supply line is suspected.
- You cannot locate the valve boxes for the non-working zone.
- Water is surfacing in the yard during a zone that should not be running — indicating a line break.
Prevention Tips
- Run each zone manually at the start of every season and walk the yard to confirm every head pops up and sprays the correct pattern.
- Flush each zone for 2 minutes when first activating for the season — flushes debris that accumulated over winter.
- Replace cracked or broken heads immediately — they waste water and reduce pressure in the zone.
- Adjust head spray patterns seasonally if needed — a head aimed at pavement or siding is wasting water and potentially causing moisture problems.
- Blow out the system with compressed air before the first freeze each fall — water trapped in lines and valve bodies can freeze and crack them.
Recommended Next Step
Start with the controller manual activation test, then immediately follow with the manual solenoid test. These two checks together tell you whether the fault is in the controller/wiring or in the valve itself. Together they take about 10 minutes and resolve the diagnosis for the majority of single-zone failures.
Frequently Asked Questions
How do I find my sprinkler valve boxes?
Valve boxes are usually installed near where the main supply enters the irrigation system — often near the water meter, along the house foundation, or in the front garden bed. If you cannot find them, activate each zone from the controller and walk the yard listening for the valve click underground, or use a valve locator tool (available at irrigation suppliers).
My zone runs but some heads barely pop up. What causes this?
Low pressure in that zone. Common causes: a partially closed zone valve, a cut lateral line leaking underground, too many heads on one zone, or a failed pressure regulator at the backflow preventer. Run the zone and watch for wet spots in the lawn that appear before any heads — this identifies an underground break.
Can I replace a sprinkler head myself?
Yes. Sprinkler head replacement is a homeowner-accessible repair. Turn off that zone at the controller, unscrew the old head, bring it to an irrigation supplier to match the brand and model, and screw in the replacement. Adjust the spray arc and radius using the small adjustment screw on the head top.
Why does my sprinkler zone run at the wrong time?
Controller scheduling errors are common. Check the program schedule, run days, and start times carefully — many controllers have multiple programs (A, B, C) that can overlap unintentionally. Also check whether seasonal adjust or rain sensor bypass modes are active.
My system has a rain sensor — could it be blocking zones from running?
Yes. A faulty or triggered rain sensor prevents zones from running even when scheduled. If the sensor is old or stuck in the “wet” position after a rain, the controller will skip all zones. Test by activating a zone manually — if manual works but scheduled runs do not, the rain sensor is blocking automatic operation. Reset or replace the sensor.