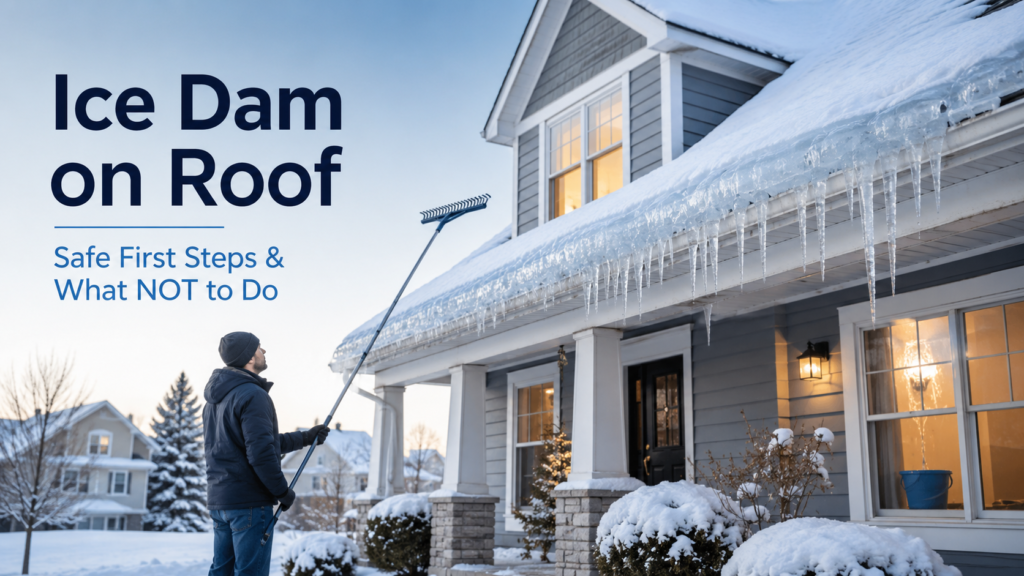
What This Guide Helps With
This guide explains the safe first steps for handling an ice dam on your roof, with strong emphasis on what NOT to do. Most ice dam advice on the internet recommends dangerous actions that cause injuries or roof damage. This guide focuses on safe, homeowner-appropriate steps and clear lines for when to call a professional.
Quick Answer
If you see an ice dam with water entering your home, the priority is protecting the interior first — not removing the ice yourself. Place towels and buckets where water enters, photograph damage, and use a roof rake from the ground only if conditions are safe (no power lines, no slippery footing). Never climb a snowy or icy roof. Hammering, chipping, salting, or using a torch on ice dams causes more damage than the dam itself.
What Is an Ice Dam (Brief)
An ice dam forms when heat escapes from your attic, warming the upper roof surface and melting snow. The meltwater flows down to the cold roof edge (eave), where it refreezes. Repeating this builds a dam of ice at the gutter line. Subsequent meltwater backs up behind the dam, pushes under shingles, and enters the home through the roof deck.
The visible ice you see at the gutter is a symptom. The cause is heat escaping the attic. This is why the long-term fix is insulation and ventilation, not just removing the dam.
Safety First — This Is Where Most Damage Comes From
The single most important advice in this guide is what NOT to do. More homeowners injure themselves attempting ice dam removal than are injured by the ice dams themselves.
| Action | Why it is dangerous or harmful |
|---|---|
| Climbing onto a snowy or icy roof | Extremely high fall risk; one of the leading causes of winter home-related injuries |
| Using a hammer, ice pick, or hatchet | Damages shingles and the roof deck; ice dam returns within days |
| Using rock salt or driveway ice melt | Damages roofing materials, kills nearby plants, corrodes gutters |
| Using a propane torch | House fires are common from this method |
| Using a power washer | Strips granules from shingles; can lift shingles |
| Using a leaf blower on hot setting | Damages shingles; ineffective on ice |
| Roof raking near power lines | Aluminum or metal poles + power lines = electrocution risk |
| Standing under ice dam removal | Falling ice can cause serious injury |
What to Do First (Safe Steps)
- Protect the inside. If water is entering the home:
- Place towels along window sills and at the base of walls where water appears.
- Position buckets to catch drips.
- Move furniture, rugs, and valuables away from affected areas.
- If the ceiling is bulging from trapped water, puncture a small drainage hole at the lowest point into a bucket — see our guide on handling indoor water from a roof source.
- Photograph the damage. Inside and outside. Include date and time. This is critical for documentation.
- Use a roof rake from the ground only if safe. A telescoping roof rake (long aluminum or plastic tool) pulls snow off the lower roof from ground level. Use only if:
- No power lines are within 10 feet of where you will be raking
- The ground beneath you is stable and not slippery
- You can stay clear of falling snow and ice
The goal is to remove snow load — not the ice dam itself. Removing snow above the dam prevents new meltwater from forming.
- Make channels through the dam. Fill a leg of an old pair of pantyhose or a long sock with calcium chloride pellets (not sodium chloride / rock salt). Lay it across the dam vertically, from gutter to roof. The pellets slowly create melt channels that allow trapped water to drain.
- Set up dehumidifiers in affected rooms. Reduce moisture to slow drywall damage and mold conditions.
- Increase home heat slightly to ensure rooms stay above 60°F and walls stay above the dew point.
- Document expanding damage with photos at each interval.
- Call a professional for actual ice dam removal — see when section below.
What Not to Do (Expanded)
- Do not climb a snowy or icy roof. The most common ice dam injury is a fall. Even professionals use safety equipment most homeowners do not have.
- Do not hammer, chip, or chisel the ice. The shingles underneath will be damaged, and shingle damage is far more expensive to repair than the ice dam.
- Do not use rock salt or generic ice melt. Sodium chloride damages shingles, gutters, and surrounding plants. Use only calcium chloride, and only inside fabric like pantyhose to control where it works.
- Do not use a propane torch or open flame. This causes house fires. Every winter, homes burn from this approach.
- Do not pour hot water onto the ice dam. The water freezes into the dam, making it larger. Also, hot water on cold shingles causes thermal shock.
- Do not power-wash the roof. The pressure strips shingle granules and can lift shingles.
- Do not use metal tools. Aluminum near power lines is dangerous, and metal scraping damages shingles.
- Do not stand directly under the area being worked on. Falling ice and snow can cause serious injury.
Related Guides
- Roof Leak After Rain: Safe First Steps
- Frozen Pipes: What to Do BEFORE They Burst
- How to Document Water Damage at Home
Safe DIY Approach Summary
- Protect interior with towels and buckets.
- Photograph all damage before any cleanup.
- Use a roof rake from ground level (only if safe — no power lines).
- Apply calcium chloride pellets inside fabric across the dam.
- Run dehumidifiers in affected rooms.
- Keep affected rooms warm to slow further damage.
- Wait for thaw rather than forcing removal yourself.
When to Call a Professional
Call a roofing contractor with ice dam removal equipment if:
- Active water is entering the home and you cannot stop it from inside.
- The ice dam is large and you cannot reach it safely with a roof rake.
- There are power lines or tall obstacles between you and the roof.
- The roof is steep, slippery, or in a location difficult to access safely.
- You see signs the roof deck may be damaged (sagging, water staining inside).
- You have multiple ice dams forming repeatedly each winter — this means an underlying insulation or ventilation issue.
- Heavy ice or snow load is straining gutters or visible roof structure.
A licensed roofer or ice dam removal specialist uses steam (not high-pressure water or torches) to safely remove ice without damaging shingles. This is the only DIY-equivalent professional method that does not damage the roof.
Prevention — The Real Long-Term Fix
Ice dams form because heat escapes from the attic. The dam itself is a symptom. Prevention focuses on the heat source:
- Air sealing the attic floor. Penetrations around can lights, plumbing stacks, ducts, and chimneys leak warm air upward. Sealing these is often the highest-impact single fix.
- Attic insulation upgrade. Most homes built before 2000 are underinsulated by current standards. Adding insulation to reach R-49 to R-60 (varies by region) keeps heat in the home and the roof cold.
- Soffit and ridge ventilation. Proper attic ventilation allows cold air to circulate above insulation, keeping the entire roof deck cold and uniform.
- Heat cables (last resort). Electric heat cables along eaves can prevent dam formation but use significant electricity and only treat the symptom. Use these as a stopgap while planning insulation work.
- Snow rake routine. After heavy snowfall, rake the lower 3 to 4 feet of roof from the ground. This removes the snow that would otherwise melt and refreeze at the eave.
The Insulation Reality Check
Most homeowners spend money on ice dam removal year after year when the same money invested in attic air sealing and insulation would eliminate the problem. If you have ice dams every winter, consider:
- An energy audit (often free or low-cost through your utility company)
- Attic air sealing — usually a one-time investment
- Insulation upgrade — provides comfort and energy savings beyond ice dam prevention
These investments often pay back within a few winters through avoided removal costs, reduced water damage, and lower energy bills.
Recommended Next Step
If an ice dam is causing active leaking right now, protect the interior with towels and buckets, photograph everything, and call a professional for safe removal. Do not climb the roof. After the immediate situation, schedule an energy audit before next winter and address the heat-loss source. Ice dam removal alone is treating symptoms; insulation and air sealing solve the problem.
Frequently Asked Questions
How long does it take an ice dam to cause damage inside the home?
Depending on the size of the dam, water can begin entering within hours of meltwater building up. The damage inside is roughly proportional to time of exposure — drywall, insulation, and framing absorb water cumulatively. Acting at the first sign of interior water is the priority.
Are heat cables a good solution?
Heat cables prevent dam formation but use electricity continuously and only address the symptom, not the heat escaping from the attic. They are appropriate as a temporary measure or for sections of roof where insulation cannot be improved. Long-term, insulation and air sealing are more effective.
Why does only part of my roof get ice dams?
Heat loss varies by attic condition above different parts of the home. Areas above bedrooms, can lights, or chimneys often lose more heat. Sections without good ventilation are also more prone. The pattern of dams reveals where the heat is escaping — an energy auditor can confirm with thermal imaging.
Will my insurance cover ice dam damage?
Policies vary widely. This guide cannot tell you what your policy covers — that is between you and your insurer. What this guide can do is emphasize prompt photo documentation, saving receipts, and reading your policy or calling your insurer. See our water damage documentation guide for the full checklist.
Can I prevent ice dams without a major insulation project?
Smaller measures help but are usually not complete solutions:
- Roof raking after heavy snowfall (free, requires effort)
- Air sealing major attic penetrations (DIY-friendly)
- Heat cables on the most affected eaves (electricity costs)
- Snow guards above doorways and walkways (safety addition)
The most effective long-term fix is still insulation plus air sealing, but staged improvements can reduce the problem significantly.